I have a 2002 GMC Envoy SLT. Recently I have noticed that after the vehicle sits overnight, It sits lower in the rear. I know it has an air suspension system and I am pretty sure that there is a leak in the system somewhere. After starting the engine, the rear end rises in about a minute's time and the suspension works normally. Has anyone had this problem before or can anyone offer any advice on how to proceed to correct this proble?
You are using an out of date browser. It may not display this or other websites correctly.
You should upgrade or use an alternative browser.
You should upgrade or use an alternative browser.
Rear air suspension leak?
- Thread starter rfig1
- Start date
Molson02536
New member
I have a 2002 GMC Envoy SLT. Recently I have noticed that after the vehicle sits overnight, It sits lower in the rear. I know it has an air suspension system and I am pretty sure that there is a leak in the system somewhere. After starting the engine, the rear end rises in about a minute's time and the suspension works normally. Has anyone had this problem before or can anyone offer any advice on how to proceed to correct this proble?
Here is a link to your air suspension to your Envoy. You have a small leak somewhere and the most common places will be the air bags there self or the air lines where they connect to the air bags and the compressor.
Spray the air bags and air lines where they connect with a mixture of dish soap and water from a sprayer. Look for bubbles from where you sprayed, if there is any bubbles from where you sprayed. That is where your issue is and you should hear the air leak better.
The only other area would be a check valve at the air compressor assembly that the air is leaking from and that is also serviceable. NOTE: WHEN WORKING ON THE AIR SUSPENSION, MAKE SURE YOU HAVE THE ENVOY SAFELY SECURED WITH JACK STANDS ON THE FRAME TO TAKE THE LOAD OFF THE SUSPENSION TO ENSURE YOU STAY ALIVE.

Good luck and be save.
") http://www.compnine.com/index.php?u...delid=6702&capuid=1&majorgroup=07&grouptype=B
http://www.compnine.com/index.php?u...delid=6702&capuid=1&majorgroup=07&grouptype=BThanks Molson, And thanks for the link to the schematic. Finding an air leak is not a fun thing. I am wondering though, why don't I hear the compressor operating when I start the vehicle and the air bags are being inflated? I hear it at other times when it is making adjustments to the suspension. Is there another source of air that inflates the airbags after starting the engine?
Molson02536
New member
Thanks Molson, And thanks for the link to the schematic. Finding an air leak is not a fun thing. I am wondering though, why don't I hear the compressor operating when I start the vehicle and the air bags are being inflated? I hear it at other times when it is making adjustments to the suspension. Is there another source of air that inflates the airbags after starting the engine?
Nope that it the only place that inflates your air bags. There is a few seconds before the compressor will turn on, this is do so that as your suspension goes up and down. The levelers will not turn the compressor on and off due to the different ride height, which reminds me that the levelers are also another place that is pron to air leaks due to mechanical wear.
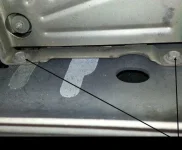
Here is a picture to where you can find your levelers, just follow the linkage to the valve and good luck on your project. this is not that hard to address the issue just time consuming so save you self $70.00 per hour service charge at the Shop.

Keep us posted.
http://forums.trailvoy.com/attachment.php?attachmentid=5784&d=1248013766
qed-engineer
New member
- Joined
- Nov 18, 2010
- Messages
- 1
- Reaction score
- 0
- Points
- 0
where are these bags and compressor physically located, my 2002 is sitting on the ground each morning now too, 180K miles
steelers6timechamps
New member
- Joined
- May 1, 2011
- Messages
- 1
- Reaction score
- 0
- Points
- 0
Air suspension leak
This has really been helpful. I am pretty sure that the airbags are leaking on mine, especially the R/S. The page with the part numbers are great also. Are these GM part numbers? If so does anyone have any idea if you can purchase these parts from another parts store such as Napa, Sanels, Autozone, Advanced Auto, JC Whitney or any other place besides the dealer? $153 a bag is quit pricey luckily I can do the job myself and save the labor.
This has really been helpful. I am pretty sure that the airbags are leaking on mine, especially the R/S. The page with the part numbers are great also. Are these GM part numbers? If so does anyone have any idea if you can purchase these parts from another parts store such as Napa, Sanels, Autozone, Advanced Auto, JC Whitney or any other place besides the dealer? $153 a bag is quit pricey luckily I can do the job myself and save the labor.
I have a 2002 GMC Envoy SLT. Recently I have noticed that after the vehicle sits overnight, It sits lower in the rear. I know it has an air suspension system and I am pretty sure that there is a leak in the system somewhere. After starting the engine, the rear end rises in about a minute's time and the suspension works normally. Has anyone had this problem before or can anyone offer any advice on how to proceed to correct this proble?
The method suggested by Molson is the perfect solution. But i feel you shouldn't try this at home. You have to take it to a dealer. To check the suspension unloading is necessary.
Kemosabe
New member
Install New Air Springs
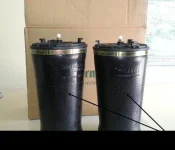
I own a 2006 GMC Envoy Denali since it was new. I purchased the longest extended warranty I could get. During the extended warranty period I began experiencing the rear of my Envoy bottoming out over night from time to time. I took it to my local GMC dealer to remedy the situation, but to no avail. They said they couldn't find anything wrong with it. As time went by the phenomena increased until my Envoy bottomed out over night every night. Unfortunately my extended warranty expired and I was left to my own devices to remedy the problem myself. I searched the internet for answers and found numerous comments and suggestions. But the day I found Arnott, Inc. (manufacturer of quality air springs) was the day I found my solution. I went online to www.arnottairsuspension.com or www.arnottinc.com and ordered two Envoy Air Springs (Item A-2610) for less than $200. A few days later my air springs arrived. I opened the box to find the two air springs plus simple, easy to follow instructions on how to install them. Here is a brief description of what I did next.
#1: Use a jack and at least two jack stands to raise your vehicle in the rear.
#2: WARNING-This precaution cannot be stressed enough; be extremely careful lifting your vehicle and placing jack stands squarely under your frame. Do not, I repeat, do not place your head or body under your vehicle until you are absolutely positive your vehicle is confidently supported by the jack stands.
#3: Remove rear tires. Rear suspension must be at full rebound with no load.
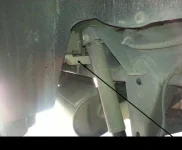
#4: Locate the air compressor behind the right wheel.
#5: Remove two ½” mounting bolts from the compressor mounting plate. Lift upward on the compressor assembly and unhook the unit from the frame rail.
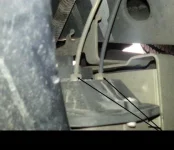
6: Deflate both rear air springs by disconnecting the two air lines leading from the compressor assembly to the rear air springs. I used a 10mm open end wrench to accomplish this step.
#7: Rotate the rear air springs counterclockwise and pull down to remove them from the axle. Your air springs may be held from turning because of a plastic clip at the top of the air spring. Reach up over the top of the air spring mounting frame to find the clip. Press down while turning counterclockwise to free it from the mount.
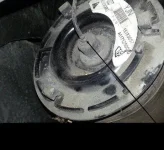
#8: Disconnect the air line from the air spring by taking a screwdriver and pressing down on the silver compression fitting and while pulling the air line out. Protect the air line from debris and dust.
#9: Remove the old air spring.
#10: Replace old springs with Arnott Air Springs.
#11: Remove the white shipping pin on top being careful not to get any debris into the new air spring.
#12: Push air line into the new Arnott Air Spring until it stops. Air line will seal itself when fully seated.
# 13: Reverse steps #7 working back to #1 and you are done my friend. Problem solved.
HAVE FUN
I own a 2006 GMC Envoy Denali since it was new. I purchased the longest extended warranty I could get. During the extended warranty period I began experiencing the rear of my Envoy bottoming out over night from time to time. I took it to my local GMC dealer to remedy the situation, but to no avail. They said they couldn't find anything wrong with it. As time went by the phenomena increased until my Envoy bottomed out over night every night. Unfortunately my extended warranty expired and I was left to my own devices to remedy the problem myself. I searched the internet for answers and found numerous comments and suggestions. But the day I found Arnott, Inc. (manufacturer of quality air springs) was the day I found my solution. I went online to www.arnottairsuspension.com or www.arnottinc.com and ordered two Envoy Air Springs (Item A-2610) for less than $200. A few days later my air springs arrived. I opened the box to find the two air springs plus simple, easy to follow instructions on how to install them. Here is a brief description of what I did next.
#1: Use a jack and at least two jack stands to raise your vehicle in the rear.
#2: WARNING-This precaution cannot be stressed enough; be extremely careful lifting your vehicle and placing jack stands squarely under your frame. Do not, I repeat, do not place your head or body under your vehicle until you are absolutely positive your vehicle is confidently supported by the jack stands.
#3: Remove rear tires. Rear suspension must be at full rebound with no load.
#4: Locate the air compressor behind the right wheel.
#5: Remove two ½” mounting bolts from the compressor mounting plate. Lift upward on the compressor assembly and unhook the unit from the frame rail.
6: Deflate both rear air springs by disconnecting the two air lines leading from the compressor assembly to the rear air springs. I used a 10mm open end wrench to accomplish this step.
#7: Rotate the rear air springs counterclockwise and pull down to remove them from the axle. Your air springs may be held from turning because of a plastic clip at the top of the air spring. Reach up over the top of the air spring mounting frame to find the clip. Press down while turning counterclockwise to free it from the mount.
#8: Disconnect the air line from the air spring by taking a screwdriver and pressing down on the silver compression fitting and while pulling the air line out. Protect the air line from debris and dust.
#9: Remove the old air spring.
#10: Replace old springs with Arnott Air Springs.
#11: Remove the white shipping pin on top being careful not to get any debris into the new air spring.
#12: Push air line into the new Arnott Air Spring until it stops. Air line will seal itself when fully seated.
# 13: Reverse steps #7 working back to #1 and you are done my friend. Problem solved.
HAVE FUN